Canva Bulk Create for Instagram Posts: A Step-by-Step Guide
Canva Bulk Create for Instagram, step by step: a 1080x1350 template, a CSV with a row per post, connected fields, its limits and when an alternative is faster.
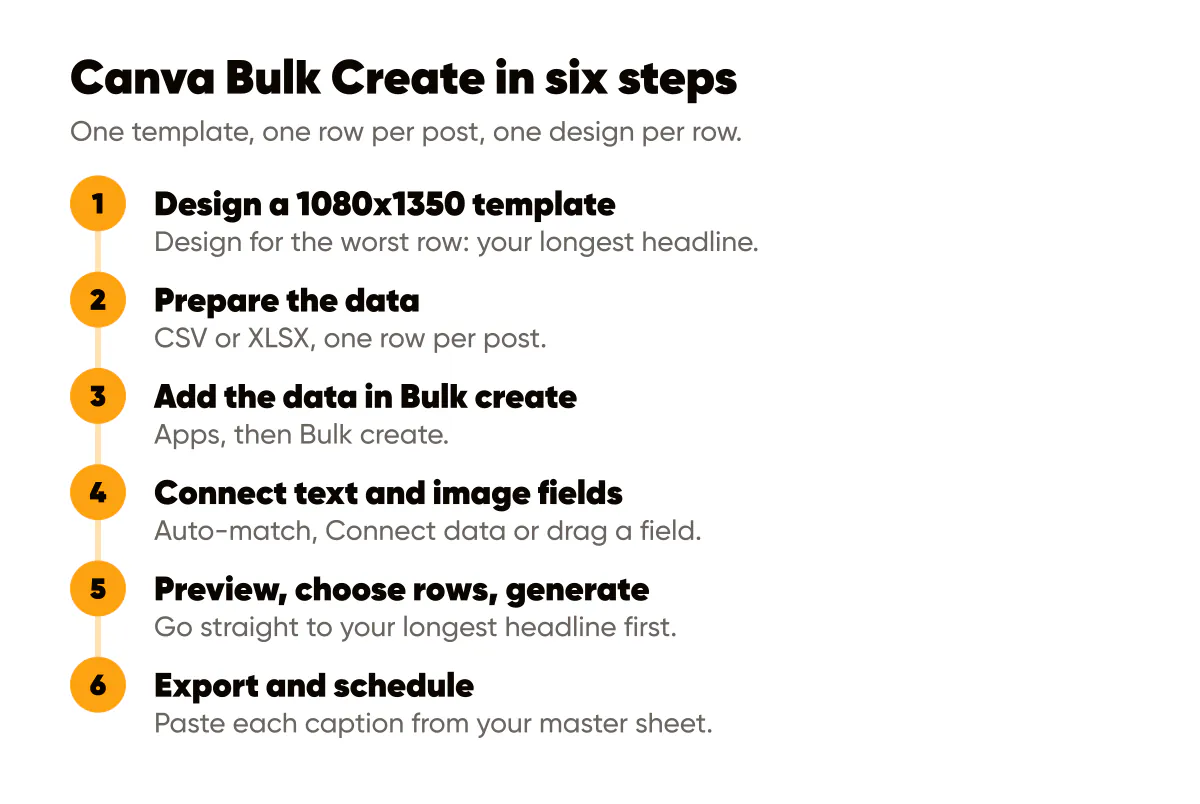
To bulk create Instagram posts in Canva, design one 1080x1350 template, open Bulk create from the Apps panel, enter your data manually or upload a CSV or XLSX file with one row per post, connect each column to a text or image element, preview the rows, and generate. Canva then makes one design per row. Bulk Create is on Canva's paid plans only, and you still write every row yourself.
I build Creobee, a tool that bulk creates posts a different way, so I have spent more time than is healthy inside other people's bulk workflows. This is a straight tutorial first. The details come from Canva's own help center as of September 2026; where I could not confirm a menu name, I describe the step instead of guessing. At the end I say plainly when Canva is the better tool and when a brief-based generator is faster. If you came looking for a Canva Bulk Create alternative that writes the rows too, the Canva alternative page compares the two approaches side by side.
What Canva Bulk Create does (and does not do)
Bulk Create is a data merge. You make one design with placeholder elements, give Canva a table, and it produces a copy of the design for each row, swapping in that row's text and images. It does not write anything, choose anything or vary the layout. Row 1 and row 30 have the same design with different contents.
The facts worth knowing before you start, all from Canva's help center as of September 2026:
- It is available on paid plans (Pro, Teams, Business, Enterprise, Education and Nonprofits), not on the free plan, and Canva lists it as desktop only.
- Data can be entered manually or uploaded as a CSV or XLSX file.
- You can select up to 300 rows and 150 columns, with up to 150 data fields.
- Both text and image elements can be connected to data.
If your month of Instagram posts is 12 to 30 posts, the row limit will never bother you. The writing will.
Step 1: design a template that survives 30 different headlines
Start a design at 1080 by 1350 pixels, the 4:5 portrait size that fills the most space in the Instagram feed. (Why that size, and how the grid crops it, is in the 4:5 portrait post guide.) Then design for the worst row, not the best one.
- Give the headline room. Make the headline text box wide and leave empty space under it. Your shortest headline will look fine anywhere; your longest one decides the layout.
- Keep text inside a safe area. The profile grid shows each 4:5 post as a slightly narrower 3:4 tile, which hides about 34 pixels on the left and right of a 1080 pixel post, so keep the headline, subline and logo well in from the side edges, with a comfortable margin at the top and bottom too.
- Fix the logo and never connect it. The logo is the same on every post, so it stays a normal element. Same corner, same size, 30 times.
- Use a frame for photos. For an image column, add a frame or grid from Elements as the placeholder. Canva fills it per row, and a frame crops each photo to the same shape.
- Check contrast once, for the worst photo. If text sits over photos, test white text over your brightest image. The text contrast checker gives you a pass or fail in seconds; a dark overlay under the text usually fixes a fail.
A template for an imaginary bakery might be: a full-bleed photo frame, a 40% dark overlay, a two-line headline in the upper third, a smaller subline under it, and the logo bottom right.
Step 2: prepare the data (CSV or XLSX)
Build the table in any spreadsheet. The first row holds column names; every row after that is one post. For the bakery, a month might start like this:
| headline | subline | image | caption |
|---|---|---|---|
| Sourdough takes 36 hours | Here is where the time goes | (photo of dough) | Most of it is waiting... |
| Croissant or pain au chocolat? | Tell us in the comments | (photo of pastry case) | We sell both before 9... |
| Closed Monday, back Tuesday at 7 | Same bread, fresh start | (photo of storefront) | A short break for the team... |
A few rules save most of the pain later:
- Headline column: short and specific. Aim for one idea in about six to eight words. Add a helper column with a character count (
=LEN(A2)in most spreadsheets) and sort by it, so the longest headlines are the ones you test first. - Subline column: optional, and even shorter. If half your rows leave it empty, remove it from the template; empty boxes leave odd gaps.
- Image column: embed, do not link. Canva's help center says images must be embedded directly in the sheet, each within a single cell rather than floating over several, and that image URLs from cloud storage are treated as plain text. A CSV is plain text and cannot hold an image, so if you need an image column, use an XLSX file with embedded images or a Canva Sheet.
- Caption column: keep it, but in your own copy. Captions do not go on the image, so they are not part of the merge. Keep them in your master sheet next to their row so each caption travels with its post into your scheduler, and upload a copy without that column if you want the data panel clean.
- Save as UTF-8. If apostrophes or accented letters come through as odd symbols, re-save the file as "CSV UTF-8" and upload again.
Canva's Magic Write can draft rows for you, and so can any chat model. Either way, you are still the one pasting, checking and fixing 30 lines. Caption structure ideas for that column are in Instagram caption frameworks.
Step 3: add the data in Bulk create
With the template open, go to Apps and choose Bulk create. You then either choose Enter data manually, which opens a small table inside Canva, or upload your CSV or XLSX file. Manual entry is fine for five rows. For a month of posts, prepare the file outside Canva, where you can sort, count and spell-check.
Step 4: connect text and image fields
Now tell Canva which column goes where. Canva's help center describes three ways:
- Auto-match fields, which lets Canva analyze the design and connect the data for you.
- Connect data from the element's More (…) menu, then pick the field.
- Drag a data field from the side panel onto the element.
Connect the headline column to the headline text box, the subline to the subline, and the image column to the photo frame. If you use Auto-match, check each connection anyway; it takes ten seconds and saves regenerating.
Step 5: preview, choose rows and generate
Before generating, preview how each row looks in the design. This is the most important step in the whole process, and the one people rush. Go straight to your longest headline, your widest photo and any row with an empty cell. Then choose which rows to include and select Generate. The button shows the number of designs it will make.
Step 6: export and schedule
Check every generated post once more at the size people will see it. Then download them as images and load them into your scheduler, one per posting day. On Canva Pro, the Content Planner can schedule them from inside Canva; any other scheduler works too. Paste each caption from your master sheet as you go, and space offers about a week apart so the feed does not read like a catalog.
Common mistakes (and quick fixes)
Text overflow. A headline that fits in row 1 wraps to four lines in row 17 and runs into the logo or off the safe area. Fix it at the source: cap headline length in the sheet, test the longest row in the preview, and design the text box for that row.
Long headlines as a habit. Thumbnails are small. A seven-word headline is read; a sixteen-word one is skipped. If a line needs more words, the extra words belong in the caption.
Image fields that come through as text. If a row shows a web address instead of a photo, you linked instead of embedding. Per Canva's help center, image URLs are treated as plain text, so embed the photos in the XLSX, each inside one cell.
Mixed photo shapes. A tall phone photo and a wide landscape photo crop very differently in the same frame. Pick photos with the subject in the middle, or crop them to 4:5 before you embed them.
Thirty posts of the same kind. The template does not care what the rows say, so it is easy to fill 30 rows with 30 tips. Add a "type" column (tip, question, behind the scenes, offer, customer story) and fill it before you write any headline. The layout is the same on every post; the content should not be.
When a brief-based generator is faster (and when Canva is better)
Canva is the better tool when the design matters more than the words. You want your own layout, you need several formats (Stories, Reels covers, carousels, print), or the data already exists: 80 products with prices, a speaker list, a set of quotes. Bulk Create turns that into designs in minutes, and nothing I build does custom layouts. If your team already lives in Canva, stay there. The fuller trade-off is in Canva vs AI generators for social posts.
A brief-based generator is faster when the empty spreadsheet is the real job. For a month of Instagram posts for your own business, the template takes an evening once, but the 30 headlines and 30 captions take hours every month. Creobee skips that part: you describe the business once, and it hands back the whole batch (a mix of content pillars and formats, so it is not 30 tips), every post a finished, branded 1080x1350 image with its headline, its caption and your logo. The AI content calendar generator page shows what a month from one brief looks like.
The limits are real, so here they are: Creobee makes single-image 4:5 posts only, with a layout for each kind of post chosen by the tool rather than by you, with no carousels, Reels or Stories, and no template editor. If those matter, Canva wins, and the Canva alternative page is honest about where. If what you want is a month of on-brand feed posts without writing 30 rows, try an AI content calendar generator that writes the rows for you: your first 3 posts are free, no card needed. For the wider view of bulk scheduling, spreadsheet templating and brief-based generation, with time estimates for each, see how to bulk create social media posts.
Frequently asked questions
Can I use Canva Bulk Create on the free plan?
No. As of September 2026, Canva's help center lists Bulk Create for Pro, Teams, Business, Enterprise, Education and Nonprofits accounts, on desktop only.
Can Canva Bulk Create add a different photo to each post?
Yes. Connect an image element, such as a frame, to an image column. The photos must be embedded in the spreadsheet cells (an XLSX file or a Canva Sheet); a link to a photo is read as plain text, and a CSV cannot hold images at all.
How many Instagram posts can I make with one Bulk Create run?
Up to 300 rows, so up to 300 designs per run, which is about ten months of daily posting. For social posts the real ceiling is how many good rows you can write.
Does Canva Bulk Create write the captions?
No. It fills the design with what is in your rows. Captions are not part of the image, so keep them in your own sheet and paste them into your scheduler, or draft them first with Magic Write or another assistant.
Put it into practice
Turn this into posts designed for your feed
Paste your website. Creobee reads what you sell, then plans, writes and designs your posts about it as one feed in your logo and colors, captions included, and on Autopilot it posts them for you.
How the AI content calendar generator works